Q Bike Creation 2
The original handlebars are too narrow, too high for my height, too close to the saddle and with no adjustments. The steering lacks self centering due to lack of caster angle, so this is made worse by the narrow high handlebars. Like many folders, the steering join has "slop". All this meant that a right turn hand signal at speed down a bumpy hill was only for the brave. Of course the play and wrong angles from the geometry meant poor pedalling efficiency, no problem for a single speed bike that wouldn't be pedalled much, but no good for me. Since the custom tall steering column couldn't be easily
modified, time for some lateral thinking. What I did was buy a competition riser handlebar with swept hand grip ends and mount it upside down and rotated forward as seen at the right. This lowered the handlebar 1.5" and pushed the handgrips about 1" forward, leaving me with the slight lean forward I wanted and an effective working relationship to the pedals.


The steering column slop was dealt with by glued in shims as shown by the arrows on the right, these providing preload as seen at the far right before the clamp is fully tightened. Tightening locks out the slack in the join, and this
together with the lowered and full width bars which shorten the handgrip to fulcrum distance results in markedly increased steering stiffness and precise control at speed.


The original saddle was very comfortable but impeded the thighs when pedalling. By good fortune someone who'd just bought a second hand Quando wanted a more comfortable saddle, her's having the one with a light later fitted to the Torq, so a swap was organised. This also solved the problem of the low rear light being inadequate, motorists now puzzled by the "Christmas tree" at the far right. The first photo also shows the lower handlebars.
The saddle was mounted as far back on it's rails as possible to finalise the respacing of the frame's functional dimensions. The hinge for changing the battery was kept and the sprung seatpost hasn't been changed yet since I'm not heavy enough for it to operate now the saddle is so far back, so now one of the targets had been fully met, the complete removal of any suspension, flexing and lack of rigidity, all of which sap pedalling power.
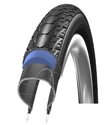
The next thing in maximising the bicycle efficiency was to shod it's bare rims. Because punctures and tube changes are so unwelcome on heavy electric bikes, and because I wanted a very low rolling resistance, there was only one choice of tyre, the uniquely good Schwalbe Marathon Plus seen in a cut away with it's puncture protection layer displayed
The next thing in maximising the bicycle efficiency was to shod it's bare rims. Because punctures and tube changes are so unwelcome on heavy electric bikes, and because I wanted a very low rolling resistance, there was only one choice of tyre, the uniquely good Schwalbe Marathon Plus seen in a cut away with it's puncture protection layer displayed
below, difficult to locate in size 20" x 1.75" though, but the excellent foldingbike.co.uk aka Avon Cyclery came up trumps. The other half of this is the tube of course, so in the interests of minimal maintenance I chose Schwalbe's low loss inner tubes. Since the Marathons have a thick liner layer, I used undersize 1.35" tubes which easily filled the cavity and saved weight, the tyres themselves also being lighter than the originals fitted.
With the bike optimised it was time to set up the motor for optimal performance and least noise. so a quick run to check acceleration and full speed on motor, then the rear wheel removal and full motor stripdown and bearings removal. Several have asked for photos of the insides of the Quando and Torq motor, so here they are online for the first time:
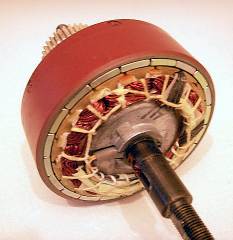
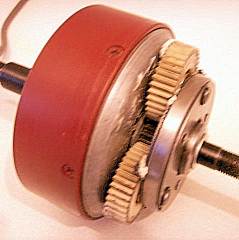
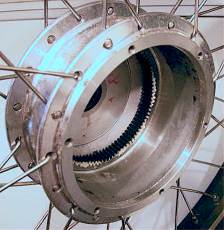
On the left you see the static armature on it's spindle, the multiple poles and their windings evident. On the left side of the thick section of the spindle you see the slot from which the wires emerge to connect to the armature windings and Hall effect sensors which lie buried within. Around the armature is the rotor, a drum which carries a ring of slim bar magnets against which the phase pulses operate and which are read for position by the Hall effect sensors as they pass. The centre photo shows the other side of the rotor with the orbital gears linked to the centre gear wheel and the freewheel beyond. Those orbital gears act on the greased orbital ring gear seen in the back of the hub shell of the third photo. The steel housing for the ball race bearing is seen in the centre of the rear hub wall, this being the same steel part from which I cut the outer band brake drum.
The motor was carefully re-assembled with everything optimised a couple more times before I was satisfied with the assembly, it pulling from low speed with a more subdued than usual powerful low hum and less of the harsh growling quality it can have normally. At 15 mph it's sound disappears completely, even from a turned head straining to hear it.
The motor was carefully re-assembled with everything optimised a couple more times before I was satisfied with the assembly, it pulling from low speed with a more subdued than usual powerful low hum and less of the harsh growling quality it can have normally. At 15 mph it's sound disappears completely, even from a turned head straining to hear it.
Now for a look at the incidental equipment that makes a bike complete, this is where so many bikes fail. I've modified the Q with the same split throttle mod that I created for my torq, this giving perfectly precise control which the standard one is


incapable of, things like the ability to consistently control to within 1 mph, and walk by the side under power at even the slowest speed with each motor pulse separated. The left hand photo shows this, with the matching SRAM twistshift shown right, the speed, free choice of any gear and precision of which I prefer to the usual up/down lever controls.


Anyone who's parked prop stand bikes on a steep hill will know of the need for more than two hands to deal with the bike, fish out the lock and secure it to street furniture, and with a trailer it's worse. Not being able to leave them in gear means that like other vehicles, they need a handbrake, occasionally seen on the Continent but never here. For a couple of grams and a fraction of a penny we can have them. At the right you see all that's needed, a u section shrouded pawl with an internal rubber bung on it's pivot bolt to keep it where it's left. The top photo shows it disengaged. Pulling the lever right in when stationary and the pawl nudged in with the forefinger engages the pawl tip with the static brake lever housing,
leaving the back brake locked on as shown in the second photo. A second squeeze and a touch on the front of the pawl shroud and it's released. Since it can only be engaged by pulling the lever well beyond wheel locking point, it can't be set accidentally when riding.
The low carrier still sat too high due to using a proprietary design that had square block lower tube termination which mismatched the slope of the upper rear frame tube. I've cut these to an appropriate angle and refitted the carrier an inch lower, now only 22" high.
The low carrier still sat too high due to using a proprietary design that had square block lower tube termination which mismatched the slope of the upper rear frame tube. I've cut these to an appropriate angle and refitted the carrier an inch lower, now only 22" high.

Most of the pannier bags we have available might be ok for a tent, sleeping bag etc., but for shopping they're terrible. Shapeless sacks when empty, they are almost all quite narrow, and bigger models are made by making them taller. With fragile items like fruit, eggs and the like, damage results from riding with them stacked. The Dutch who have always been utility cyclists know better, so I've equipped with Dutch panniers, wide, roomy, easy to load and with removable panels they keep their shape. I've devised a lightning fast quick release system to enable rapid fitting and removal for shopping trips. Here you see the handbrake effective on this 1 in 6 (16%)
pathway slope. As well as the pannier capacity, there's a large flat platform area for boxed goods to be bungeed to. Of course on the Q bike, these items are where they should be, low down and stable, not perched dangerously high alongside or on carriers above 26" or 28" wheels, those also markedly limiting the weights that can be carried.
The original stand was a twin leg one, this being needed to hold the chainwheel off the ground when the bike is folded in half, but that stand fouled the derailleur chainline. Also, with the handbrake necessary for heavy trailer use on hills, a propstand has to be used to keep the rear wheel in firm ground contact. Therefore two stands have been fitted. One is a frame tube mounted propstand with pushbutton instant length adjustment for uneven surfaces. The other is the esge folding twin leg design from Pletscher. This is fitted to the usual stand platform using a thick spacer to clear the underslung rear V brake, and has some of it's top mount cut away to give clearance for the brake arm cable bolt. Below you see three photos, first on the left showing both stands folded up showing how the twin legs fold neatly into the same side, then centre with the prop stand down, and at the right, the twin leg stand down and clearing the chain as it would be when the bike is folded.
The original stand was a twin leg one, this being needed to hold the chainwheel off the ground when the bike is folded in half, but that stand fouled the derailleur chainline. Also, with the handbrake necessary for heavy trailer use on hills, a propstand has to be used to keep the rear wheel in firm ground contact. Therefore two stands have been fitted. One is a frame tube mounted propstand with pushbutton instant length adjustment for uneven surfaces. The other is the esge folding twin leg design from Pletscher. This is fitted to the usual stand platform using a thick spacer to clear the underslung rear V brake, and has some of it's top mount cut away to give clearance for the brake arm cable bolt. Below you see three photos, first on the left showing both stands folded up showing how the twin legs fold neatly into the same side, then centre with the prop stand down, and at the right, the twin leg stand down and clearing the chain as it would be when the bike is folded.
Although my Torq hasn't suffered the brake judder problem that used to be associated with it, my Quando has been plagued by it. Pad changes had alleviated it enough, but with this faster bike on which I wouldn't want to wear the rear rim unduly and the front brake doing most of the work, better was needed. After trying various models I've ended up with a hybrid system, Diacompe,Tektro and Shimano components used with Shimano's Deore MX cartridge brake pads, giving low rim wear, smooth progressive and powerful braking which verges on locking the front wheel without becoming really dangerous.

Front mudguards make great airbrakes, scooping up large quantities of air and compressing it against the near vertical inner rear of the mudguard. Not exactly efficient, so I've filed out the mudguard bracket and mounted it so that the front is tyre hugging. The narrow space between tyre and guard is now adjusted to gradually increase as it goes to the rear. This way, the air that does try to enter is impeded by the flow of air trapped by the tread moving forward, and the remainder that does get in is decompressed by the widening gap, reducing the drag to be as low as possible.
That completes the efficiency optimising of the bicycle part. The major gains are the addition of well matched rider gearing, the greatly improved tyres, and the improvements to the rider/bike geometry. All the many other gains detailed are minor, but they add up to make a fourth major gain, all of them in total promising a transformed riding experience.

The puny bell seen in many of the above photos just wasn't adequate on a faster bike in an urban area, especially with noisy heavy traffic, so I've fitted the self contained battery electric one shown at the right. From Fisher Leisure, it has a handy push pad on the rear for thumb operation and gives a quite deep loud sound akin to that of older cars.
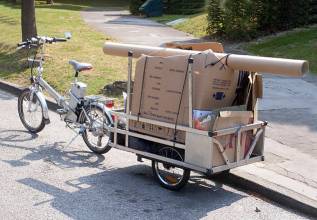
And now to one of my most important needs for a fully capable bike, heavy towing for my regular recycling trips. Here during the collection run, the Q bike has pulled a fair size load up this 1 in 7 (14%) with ease at 9 mph with me seated. That box in the centre is filled with other materials including metals and glass. This demonstrates the strength and performance of the Q bike for this application. The trailer is another one of my designs, made out of stripped down discounted aluminium step ladders.
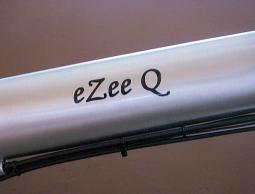
The finishing touch of course is the modification of the main frame tube decals from eZee Quando to eZee Q.
And now to what you've been waiting for, the full picture of it's Performance
12.5.2007
.
.

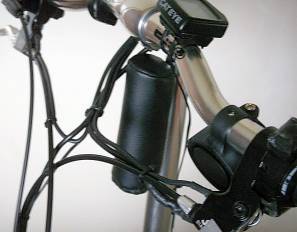
After all this work I don't want to lose the bike of course, so I've added this alarm, a rather neat twin sounder job from a Canadian P. Ducharme, sold through Amazon. Easy to set and stop, with my own choice of any code combination via the three buttons. Operates on a PP3 and claimed to be waterproof.
It probably is, but as a precaution I've made the leathercloth cover you see at the right. Some of the mounting fitments with the alarm are flimsy, but I've done the safest thing and mounted it with two small concealed self tappers direct to the handlebar stem. A bit like car alarms, it gives warning beeps twice before firing off for 20 seconds or so very loudly. The number of warning beeps can be programmed. It senses movement through the moving mass of internal ball bearings rolling about, so no unreliable contacts involved. It's best mounted high on the bike since that's where any movement is magnified. Coupled with my motor cycle chain lock for the time being, I feel it's much better protected against theft now.

I use a miniature of a car type rear towball hitch, and counterbalance isn't a problem with the small wheel and battery weight ahead of that. With the cuphead of the trailer bar on the ball, the knob on the L shaped securing plate (1) is pressed down, pivoting on the hinge (2) until it's tail passes the end of the latch plate (3). the rubber band at (5) causes this to rise and lock the securing plate in place. The bolt that holds the towball has a square nut just below the ball, and the latch plate has a square hole to match, therefore keeping it aligned.


